
Build Your Own Kickass Windows PC
Building your own computer can be a rewarding experience and can save money in some situations, but not all. I recently undertook my first Windows PC build. Here’s what I learned from the experience. I’ll try to help you gauge whether building your own computer is right for you.
When Building Makes Sense
You might think that building your own PC would always be cheaper than buying a ready-made one, but that often not the case. If you want a low or mid-level computer with standard features, building your own computer can be more expensive than buying one, especially if you factor in your time and software cost.
But, there are still some circumstances where it can make sense to build. Here are some:
- Gaming
If you want the ultimate graphics capabilities and an insanely overclocked CPU for gaming, building can make sense. - Protection from Obsolescence / Parts Re-use
This was a big part of the reason I decided to build. I was tired of throwing away a perfectly good case, power supply, and other components from Dell because they were proprietary and couldn’t be re-used. Building from scratch using standard parts allows you to upgrade any part that needs upgrading without having to throw the whole computer away. This can save you money in the long run. - Unusual Computational Needs
If you’re doing some hard-core scientific number crunching, or big-time video editing, or anything which requires tons of CPU, memory, or graphic horsepower, then building a computer to meet your special needs can make sense and can save you money. - Fun and pride
Another reason I’m glad I built my own computer is that it was fun (albeit stressful at times), and gave me satisfaction to see it working.
But, remember that when building, there is some risk involved. If things don’t work, you can’t simply return it to Dell and get a new one. This was a bit scary for me, but I decided to go for it anyway.
How Difficult is It?
It might seem daunting to assemble own PC. And yes, it does take a lot of patience and care to put one together. But, on the other hand, many of the components are pre-assembled and so it’s more a matter of just connecting the big pieces together.
If you’re pretty comfortable with tasks like swapping drives, screwing things together, installing drivers, and finding answers on Google, and you have a lot of patience during the research phase, then you probably have what it takes to assemble your own computer. I was pleasantly surprised at how many of the connectors and sockets were standardized and keyed, making it harder to plug things in wrong.
The most difficult and time-consuming part was actually the research to make sure that all of the parts would work together. Now that I’ve done it once, I feel like I could build another PC in a fraction of the time.
What Are Your Requirements?
The first step in building your PC is to define your requirements. What do you intend to use your computer for? Gaming? Video editing?
In my case, I wanted a ton of RAM because I always have a zillion browser windows open at the same time to do web development, and I wanted an SSD drive for fast booting and opening of apps, along with lots of extra drive bays. I didn’t care about graphics so much.
You’ll have to decide what things are important to you and research what kind of hardware you need for those requirements.
Researching and Selecting Parts
Now comes the most time-consuming and perhaps most important part of the build: researching and selecting the components for your computer.
Online Tools and Parts Sources
Probably the number one tool for researching and sourcing parts for me was newegg.com. Not only does it have a great selection of parts, but more importantly, it has really useful reviews by real builders. Even with the insane number of permutations of parts, I was able to find reviews there for the exact CPU and motherboard that I wanted to use, so I knew they would work together.
Another great tool is pcpartpicker.com. You can choose the parts on their site, and it will check for compatibility and give you pricing. You can also see what components other people used for their successful builds. Really great!!
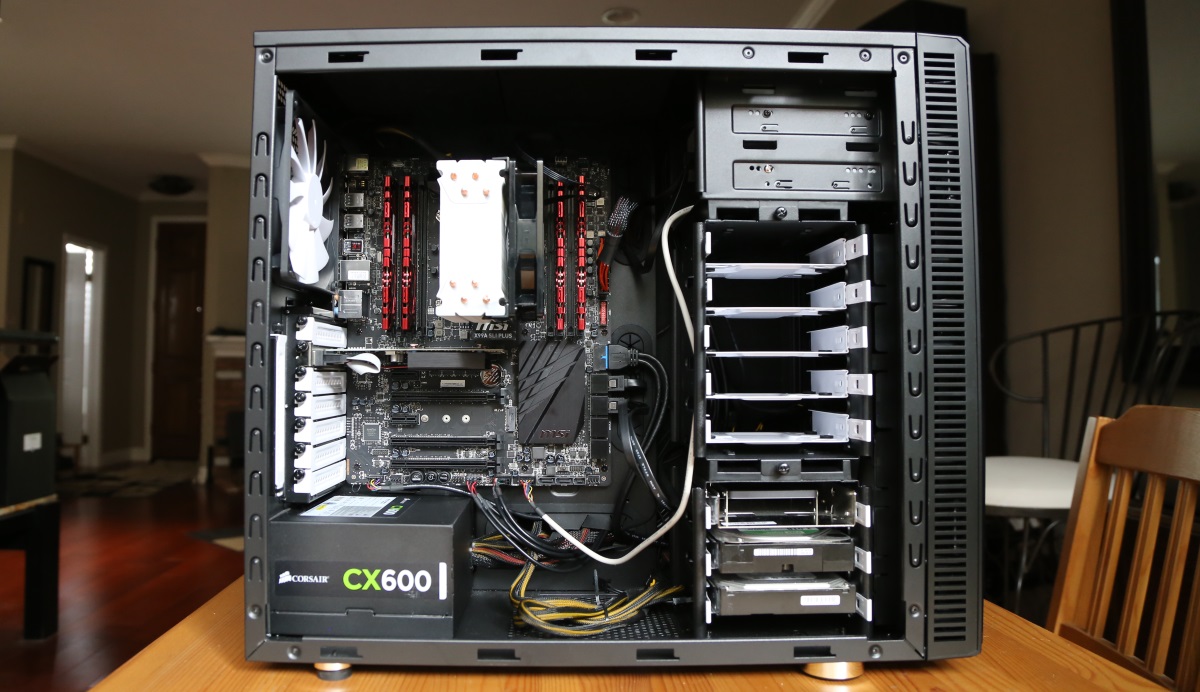
The Case
Now, getting down to the actual parts, let’s talk about the case. While there are several standard sizes, I would recommend going with a standard ATX mid-tower case for your first build if you have the space. This is the most common type of case, which will give you the most flexibility in choosing parts and the least chance of something not fitting properly.
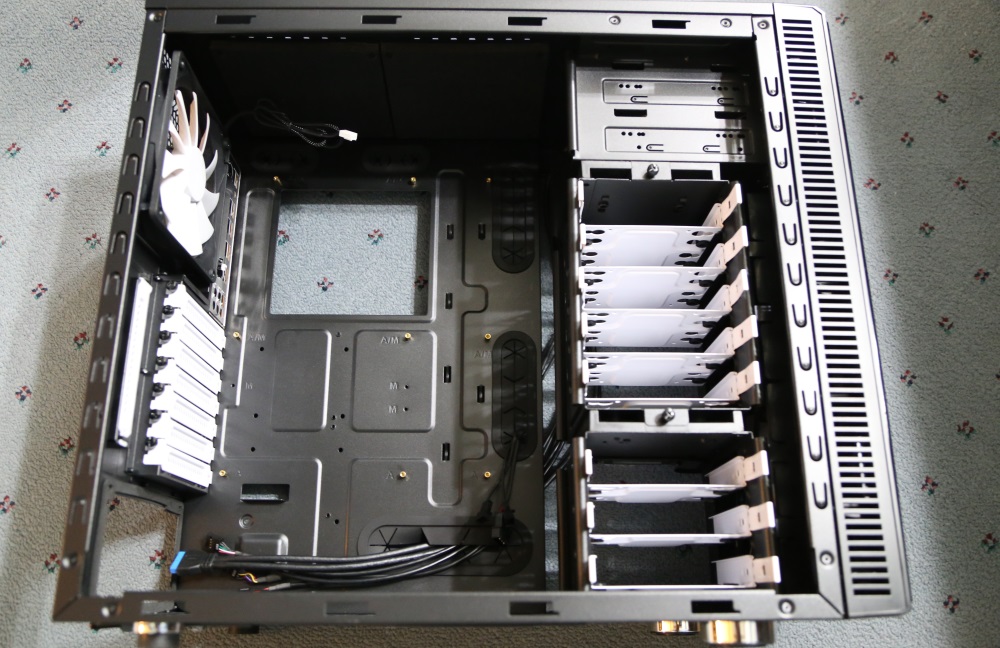
I would also suggest spending the extra money to get a really good case. Why? The case is probably the component that will last the longest in terms of obsolescence. You’ll probably be able to use the case longer than any other component, if you choose wisely. Get one that is quiet, sturdy, and has good cooling and plenty of space.
Also, search YouTube for “how-to” videos for your case. I found a video for mine that I wished I had found before I purchased, because I found out that there was a more recent version of the case for only $10 more, which would have definitely went for instead. Not a huge deal, but it is an example of why research is the most important phase of your build. In any case, these videos are super helpful!
The Processor
Note, this section is pretty old and out of date; you’ll need to research the latest processors that are currently available!
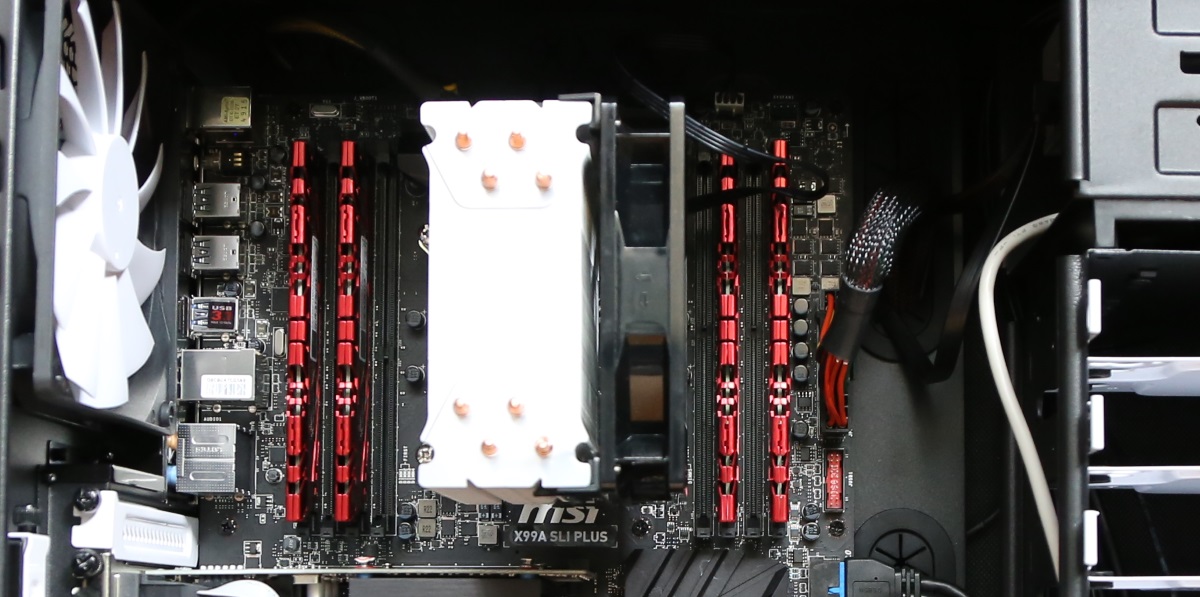
The next step is to pick your processor, which is where it can get pretty confusing due to the sheer number of choices. If you want to go to more of a budget option, look into AMD. If you want to go with Intel, I would recommend an LGA 1150 Core processor for your first build. As of this writing, the LGA 1150 socket is the most common type, and works with the most number of motherboards. Make sure your motherboard has the same socket type as your processor and same size as your case (ATX if you go with my suggestion).
Other than that, I’m going to leave the processor choice up to you because it really does depend on what you need, and models are continually changing. Note that many processors come with the cooling heatsink, which takes one more variable out of the equation for you. Otherwise, you’ll have to purchase the heatsink separately.
RAM and Graphics
You’ll also need to get RAM that goes with your processor (usually DDR3 for LGA 1150 sockets or more expensive DDR4 for 2011V3 sockets).
Some processor/motherboard combinations have integrated graphics (so you don’t need a graphics card). But, this often defeats the purpose of doing a custom build – to get a kickass graphics card. If you’re not using your system for gaming, and want to save money, then feel free to give the integrated graphics a try. Otherwise, you’ll have to purchase a graphics card. Make sure your system can handle the power and cooling requirements.
Power Supply
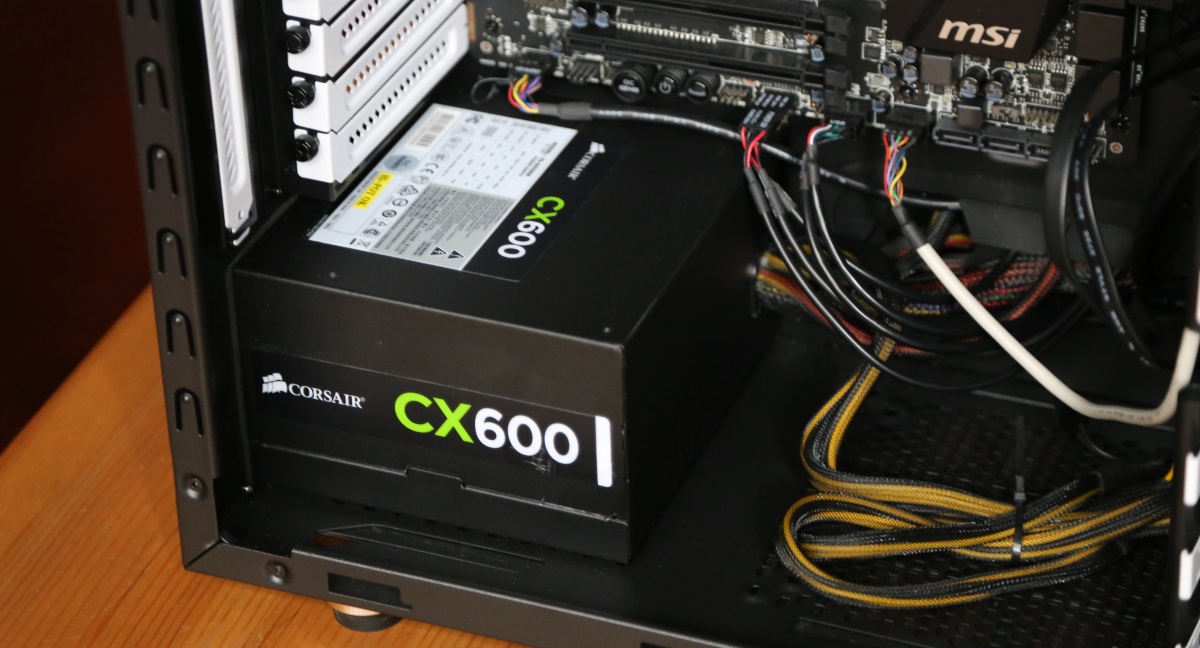
Ah, power. You’ll have to get a power supply. Add up the power requirements of your components and at least double it to come up with a power supply rating. Or, even easier, use an online power calculator. The physical sizes are mostly standardized for any particular case size, so all you have to worry about is the power rating once you find one that fits in your case style.
I recommend going with a name-brand like Corsair because you don’t want to skimp on this!
Storage
For storage, I would highly recommend an SSD (solid state drive) for your boot drive. 256GB or 500GB will be more than enough to hold Windows and your programs. For mass data storage, I used my existing 2TB traditional spinning hard disk drive (you might want to re-use your old drive here).
Other Parts
Oh, and while you’re purchasing parts, go ahead and pick up a static strap. That will ground you while you’re working and minimize the chance of damaging your sensitive components with static electricity!
If you want to save some money, and don’t mind waiting, then choose your parts on Newegg, and then sign up for their weekly email newsletter. They usually have specials that might allow you to save money on your case, memory, or storage. But, I admit that it’s hard to wait once you’ve chosen your parts!!
The Actual Build
When all of the parts arrive, avoid the urge to start immediately putting things together. Read all of the instructions carefully, especially the motherboard instructions. Search for YouTube assembly videos for your case and motherboard and watch them. Make sure you have all of the parts and tools you need. (In my case, I had forgotten to buy a SATA CD drive, which delayed my build).
When you’re ready to start, make sure that you have a large, clean, well-lit work area and that you’re well-grounded through your static strap to a screw or bare metal of a device that is plugged into the wall.
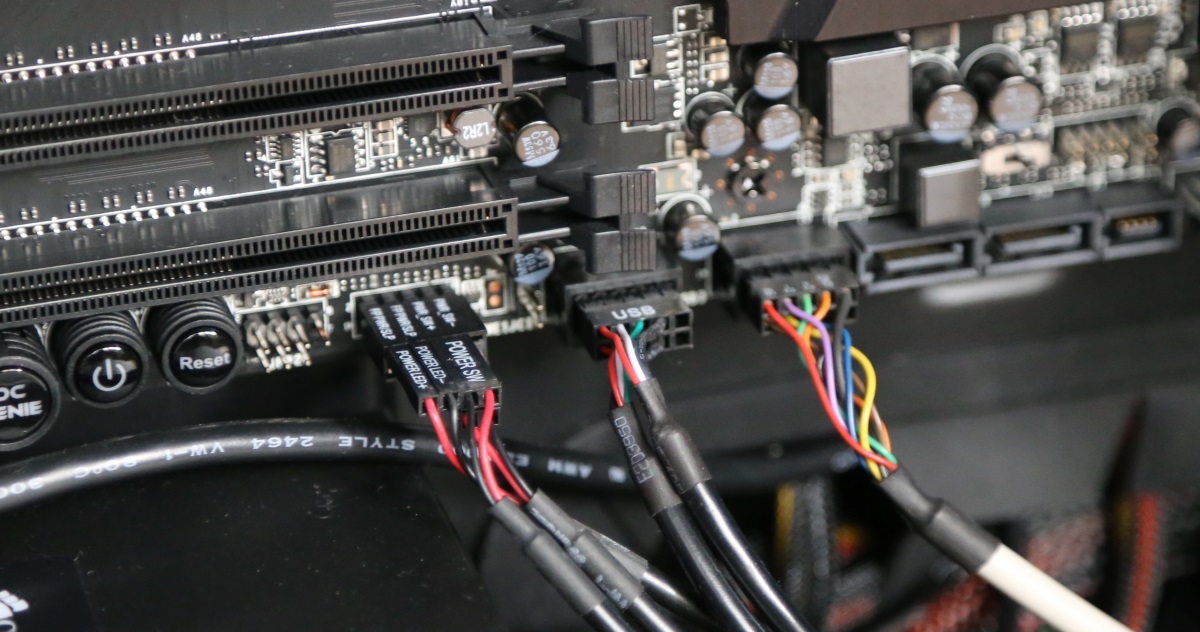
I started by attaching my motherboard to my case, then I proceeded to plug in the processor and heatsink. I’d say that for me, attaching the heatsink was the most tricky part of the whole build. Make sure you know exactly how it will go on before you apply thermal grease. I did a dry run, but even so, I had to fumble with it for quite a while before I got it right.
You might be wondering where you get the “instructions” for your build. Mainly it comes from the motherboard. The MSI motherboard that I got had pretty good instructions, and even a link to a YouTube video for each step of the assembly process. Pretty cool.
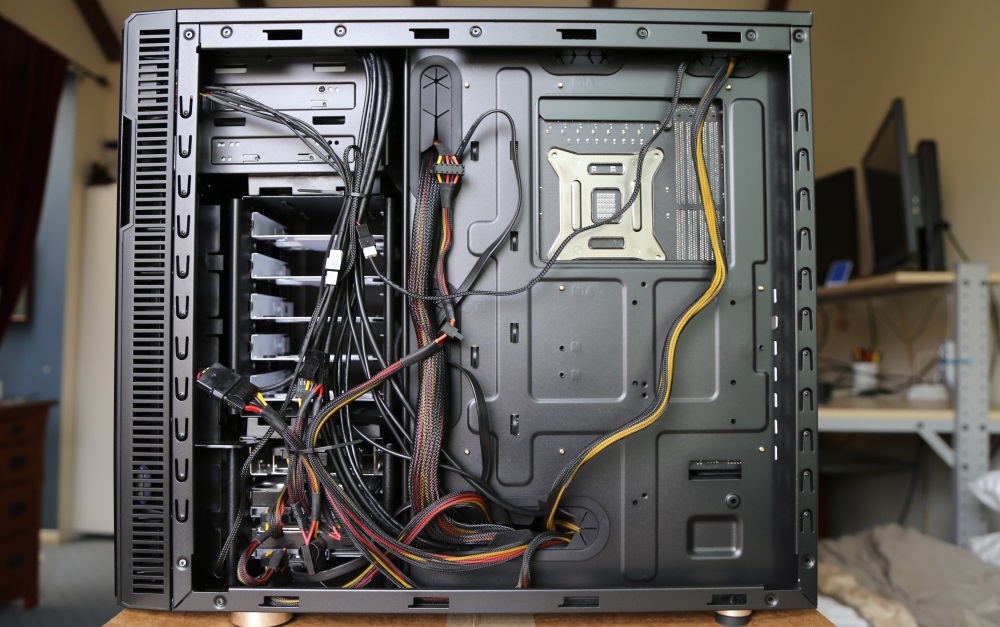
The instructions that came with my case were not as good, but most of those fan and power connectors were keyed, so it wasn’t a big deal.
The general advice I can give is to proceed with patience, double-check everything, and stay grounded through your static strap.
The total amount of time I spent in assembly to the point of getting a baseline working system was about two late-night evenings after work.
Powering On
The most exciting and stressful moment will be when you power on your system for the first time. When I powered on, the power supply came on, but some of the fans were not turning and the screen was blank. The fans were easy to fix – there was a cable that I had not attached to the power supply. The screen not going on was much much more troublesome. I started to worry that either my motherboard or processor was bad. I went online and did find some examples of bad components, but many folks said that these parts are generally pretty reliable. Someone else suggested re-seating all of my memory and that did the trick!! I felt stupid for making this rookie error, even after I had upgraded the memory of several systems before.
Once my system’s BIOS boot screen came on, I knew I was home free! Sure, there could be other problems, but at least I would have something to work with.
My SSD was from my old computer, so it actually did boot up! But, it was a 32-bit version of Windows, and I wanted to upgrade it to 64-bit to match my system, so I ended up purchasing a new copy of Windows 10 64-bit and wiping the drive.
If you do need to wipe an old drive, remember to not only back it up, but also to back up your settings (i.e., for Windows Mail, File Zilla, or any other software that has a lot of settings). You might also want to uninstall licensed software (Microsoft Office?) so that you can move it to your new system without licensing hassles.
From there, I proceeded to install Windows 10, which went quite smoothly. After that, it was a matter of transferring my old data and installing programs, which took a while but was not difficult.
After that, the system ran great, but there was one nagging problem: I was not able to get full resolution out of my monitor and graphics card. Both were rated to 2560 X 1440, but my screen was only going up to 1920 X 1080. Well, I found out that not all DVI cables are created equal. I was using an older “Single Link” cable that was not capable of the higher resolutions. I ordered one that was “Dual LInk” cable from Amazon and that solved the problem!
Conclusion
Now, I have a total kick-ass system that should last me many years. It’s got a ton of RAM, 32GB, with the ability to go to 64GB. No more crashes due to lack of memory! No more waiting for image processing! It boots and is usable in less than a minute! My only mild regret is that I wish I had gotten the later Fractal Define R5 case instead of the R4, but that is minor.
I hope this gives you a general idea of the challenges involved so you can decide if building is for you. Overall, I would say that the research and parts selection were the most time-consuming aspects of building my computer. The actual assembly requires skill, but the standardization of parts and connectors makes that easier than you might think. The only part I would say was hard was attaching the CPU heatsink. No doubt it will take time, but if you enjoy this sort of thing, it’s actually fun and feels great when it’s done!
My System Parts List
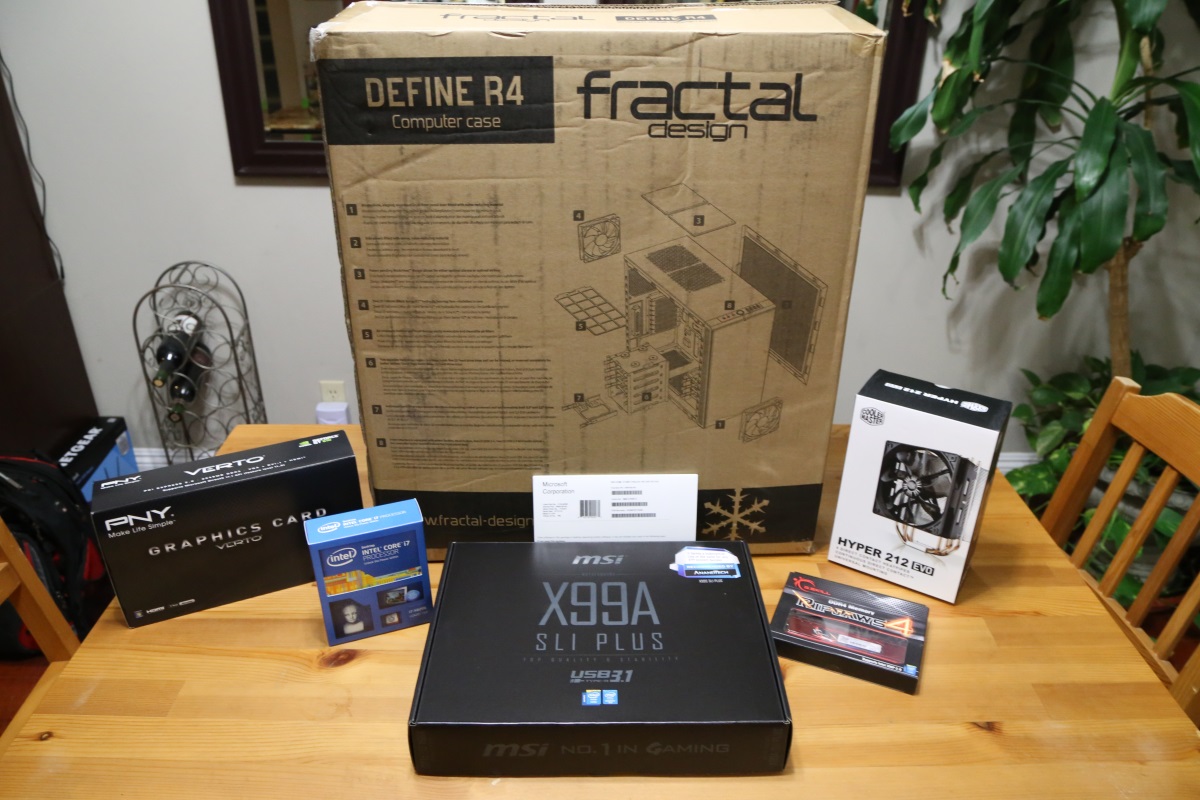
Here are the details of my build in September 2015:
Case: Fractal Design Define R4
Processor: Intel Core i7-5820K CPU @ 3.3GHz
Motherboard: MSI X99A SLI Plus motherboard
RAM: 32GB G Skill Ripjaws DDR4 memory
Graphics: PNY Geforce GT610 with 2048MB DDR3
Cooler: Cooler Master Hyper 212 EVO
Power: Corsair CX600
Boot Drive: Samsung 840 EVO 500GB
Data Drive: Western Digital WD Green WD20EARX 2TB
DVD: ASUS DRW-24B1ST DVD-RW
OS: Windows 10 64-bit
I purchased most of the above parts from Newegg.com.
Other Accessories:
Rosewill media card reader, generic Staples wired mouse (hey, it’s cheap and it’s good), HP wireless keyboard, AOC 27″ monitor (lovely!)
Good luck with your build, and please let me know how it goes in the comments! – Brian


Please Leave a Question or Comment
I try to answer each one! - Brian